















Adobe Lightroom Plugin
The Client Response Gallery Lightroom plugin adds a custom export provider to Adobe Lightroom Classic. It lets you upload photos directly from Lightroom to a gallery on your Joomla site — no manual FTP, no browser uploads. You can also create new galleries without leaving Lightroom.
System Requirements
| Requirement | Minimum |
| Adobe Lightroom Classic | 6.0 (Recommended 12.0 or later) |
| Client Response Gallery component | Installed and published |
| API access | Enabled in component settings, with a valid API key configured |
| Network | Lightroom machine must have HTTP access to your Joomla site |
The plugin does not support Lightroom CC (cloud-based) or Lightroom on mobile — it requires the desktop Lightroom Classic application.
Installation
Step 1 — Download and extract the lrplugin
Download the lrplugin from https://www.joomill-extensions.com/downloads/client-response-gallery
and unzip it
Step 2 — Place the plugin on your machine
Copy the `ClientResponseGallery.lrplugin` folder to a location on your local disk. A recommended location:
Windows: `C:\Users\[YourName]\Documents\Lightroom\Plugins\`
macOS: `/Users/[YourName]/Documents/Lightroom/Plugins/`
Step 3 — Add the plugin in Lightroom
- Open Lightroom Classic.
- Go to File > Plug-in Manager (shortcut: `Ctrl+Alt+Shift+,` on Windows / `Cmd+Option+Shift+,` on macOS).
- Click Add in the bottom-left corner.
- Browse to the `ClientResponseGallery.lrplugin` folder and click Add Plug-in.
- The plugin appears in the list with a green status indicator and the label Client Response Gallery Uploader.
- Click Done.
Configuration
The plugin is configured per export preset — settings are saved inside the Lightroom export dialog, not globally
Opening the export dialog
Select one or more photos in Lightroom, then either:
- Go to File > Export (`Ctrl+Shift+E` / `Cmd+Shift+E`), or
- Right-click the selection and choose Export > Export...
In the export dialog, scroll to the top and find the Export To dropdown. Select Client Response Gallery.
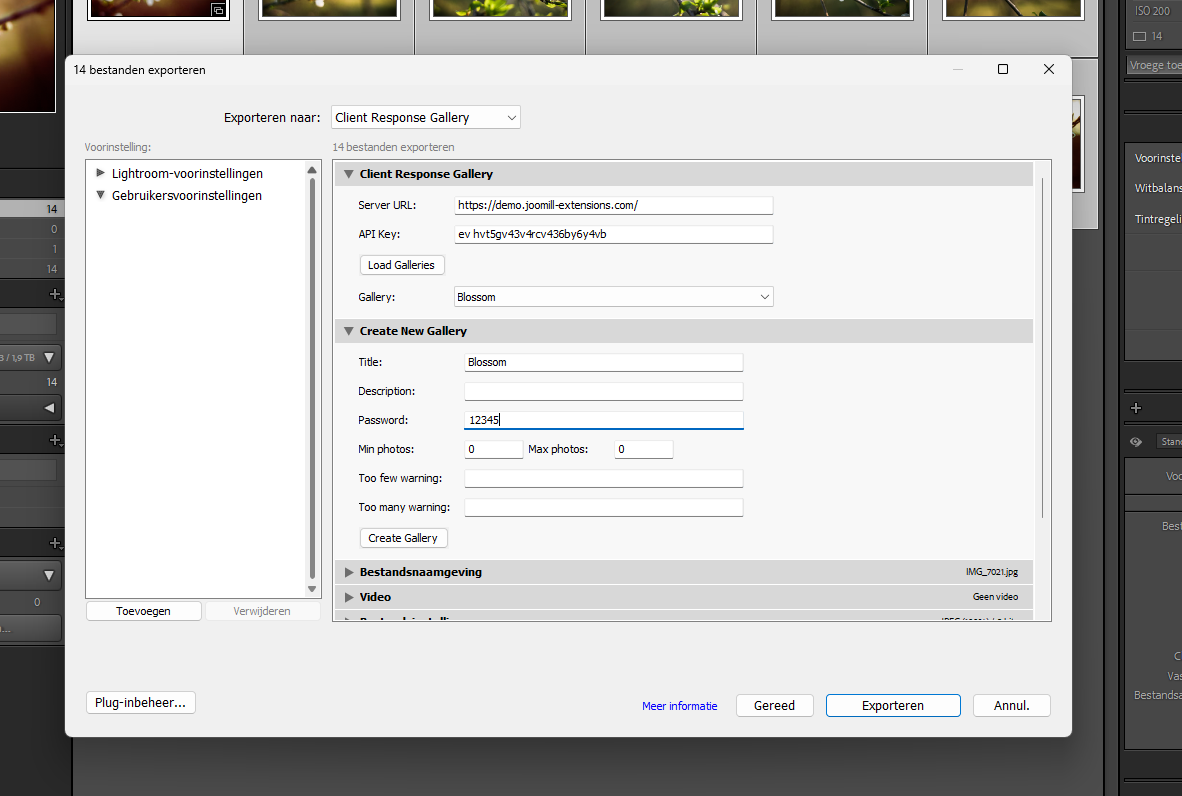
Plugin settings
Two sections appear at the top of the export dialog.
Section: Client Response Gallery
| Field | Description |
| Server URL | The base URL of your Joomla site, e.g. `https://example.com`. No trailing slash required. |
| API Key | The API key configured in the Client Response Gallery component settings (Components > Client Response Gallery > Options > API). |
| Load Galleries button | Fetches the list of published galleries from the server and populates the dropdown below. |
| Gallery | Dropdown listing all published galleries retrieved from the server. Select the gallery you want to upload to. |
Section: Create New Gallery
Use this section to create a gallery directly from Lightroom. All fields are optional except Title.
| Field | Description |
| Title | Name for the new gallery (required). |
| Description | Optional description shown on the gallery page. Supports placeholders `{min}` and `{max}` (see the component documentation). |
| Password | Optional access password clients must enter to view the gallery. Leave blank for no password. |
| Min photos | Minimum number of photos the client must select. `0` means no minimum (uses the global component setting). |
| Max photos | Maximum number of photos the client may select. `0` means no maximum (uses the global component setting). |
| Too few warning | Custom warning message shown when the client selects fewer photos than the minimum. Leave blank to use the global setting. |
| Too many warning | Custom warning message shown when the client selects more photos than the maximum. Leave blank to use the global setting. |
| Create Gallery button | Sends the form to the server, creates the gallery, and automatically selects it in the Gallery dropdown above. |
Image format settings
The plugin enforces the following output settings — these cannot be changed:
- Format: JPEG
- Color space: sRGB
- Video export: disabled
All other Lightroom export settings (file quality, long edge, sharpening, metadata stripping) work as normal and apply to the rendered JPEG before upload.
Uploading Photos
1. Select the photos you want to upload in Lightroom.
2. Open the export dialog (**File > Export**).
3. Make sure **Export To** is set to **Client Response Gallery**.
4. Enter your **Server URL** and **API Key** if not already saved in the preset.
5. Click **Load Galleries** and select the target gallery from the dropdown. Alternatively, create a new gallery using the **Create New Gallery** section.
6. Adjust Lightroom's image quality settings as needed (size, sharpening, etc.).
7. Click **Export**.
Lightroom renders each selected photo as a JPEG and uploads it to the gallery one by one. A progress bar shows the current file and overall count. After all uploads complete, a summary dialog confirms how many photos were uploaded successfully and lists any files that failed.
Rendered temporary files are deleted from disk immediately after each upload — no local copies are left behind.
Delete a gallery
What happens to the photo files and folder on the server depends on the settings in Joomla under Components > Client Response Gallery > Options > Advanced:
- Delete media files when deleting a gallery: when enabled, the photo files are removed from the server
- Delete folder when deleting a gallery: when enabled, the entire gallery folder is removed
Client selections submitted for this gallery are always deleted.
Troubleshooting
"Please enter a Server URL and API Key first"
The Server URL or API Key field is empty. Fill in both fields before clicking **Load Galleries** or **Export**.
"Could not load galleries" / "No response from server"
- Verify the Server URL is correct and includes the protocol (`https://` or `http://`).
- Confirm your Joomla site is reachable from the machine running Lightroom.
- Check that the API is enabled in the component settings and that the API key matches exactly (no extra spaces).
"No published galleries found on the server"
The API key is valid and the server is reachable, but there are no published galleries yet. Create a gallery in the Joomla backend first, or use the Create New Gallery section in the plugin.
"Could not delete gallery: Gallery not found"
"Upload completed with errors"
One or more photos failed to upload. The error dialog lists the filenames and reason for each failure. Common causes:
- The gallery no longer exists on the server.
- A file exceeded the server's maximum upload size (`upload_max_filesize` in PHP, or Joomla's media settings).
- A network interruption occurred mid-upload.
Photos that uploaded successfully before the error are saved to the gallery and do not need to be re-uploaded.
Checking the log file
The plugin writes a log file that can help diagnose unexpected errors. The file is named `ClientResponseGallery.log` and is located in the Lightroom log folder:
Windows: `C:\Users\[YourName]\AppData\Roaming\Adobe\Lightroom\Logs\`
macOS: `~/Library/Application Support/Adobe/Lightroom/Logs/`
How It Works (Technical Summary)
The plugin communicates with the component's API using standard HTTP requests authenticated via the `X-API-Key` header.
| Action | Method | Endpoint |
| Fetch galleries | GET | `/index.php?option=com_clientresponsegallery&task=api.galleries&format=json` |
| Upload photo | POST (multipart) | `/index.php?option=com_clientresponsegallery&task=api.upload&format=json` |
| Create gallery | POST (multipart) | `/index.php?option=com_clientresponsegallery&task=api.create&format=json` |
For full API reference, see API Documentation